When installed correctly, gutter guards help reduce maintenance and protect your home from water damage. However, improper installation runs the risk of voided warranties, damage to your roof, and problems like leaks that lead to costly repairs over time.
One of the most common installation questions homeowners face is whether gutter guards go under shingles or attach to the gutter itself. The answer depends on the guard type, but sliding guards under or lifting shingles is one of the most frequent DIY mistakes and can compromise your roof’s integrity. Other installation errors include using the wrong fasteners, ignoring gutter pitch, skipping pre-installation inspections, and choosing incompatible gutter guard styles for your climate or your region’s debris type.
In this guide, we’ll walk through the most common gutter guard installation mistakes and how to avoid them. Whether you’re considering a DIY gutter guard installation or comparing options for professional installation, understanding these pitfalls will help you make informed decisions that protect both your investment and your home.
In this article, we’ll discuss:
- What Are Gutter Guards?
- 10 Common Gutter Guard Installation Mistakes to Avoid
- Benefits of Proper Gutter Guard Installation
- Why Trust LeafFilter’s Professional Installation
- Your Next Steps for Clog-Free Gutters
- Frequently Asked Questions
What Are Gutter Guards?
Gutter guards are protective covers that sit on top of your gutter system, helping block debris and support consistent water flow without interfering with roofing materials. LeafFilter gutter guards use a patented surgical-grade stainless steel micromesh designed to prevent common debris from entering guards. When gutter guards aren’t installed correctly, however, they can reduce performance, create drainage issues, or even increase the risk of gutter damage.
10 Common Gutter Guard Installation Mistakes to Avoid
Proper gutter guard installation is critical to ensuring your system protects your home from water damage, pest infiltration, and structural issues. Even minor installation errors can reduce drainage efficiency, void manufacturer warranties, or create new problems like roof leaks and shingle damage that often end up costing more than the guards themselves. Many DIY mistakes stem from misunderstanding how guards should attach to gutters, how they interact with the roofline, or which materials are appropriate for different climates and debris types. Getting this wrong or installing guards in a way that interferes with roofing materials can lead to water management failures, expensive repairs, and more frequent replacement.
If you are opting to install your own gutter guards, here are some common mistakes to avoid.
1. Choosing the Wrong Gutter Guard Type and Material
Each type of gutter guard has unique features and benefits, from ease of installation to effectiveness at keeping out small or large debris. Choosing the wrong gutter guard type or material may increase maintenance needs or reduce long-term performance. It’s important to select a gutter guard type that aligns with your local climate, roofing style, and the kinds of debris common in your area.
In areas with heavy sunlight, lightweight materials such as plastic screens, foam, and brushes can be damaged by UV rays and temperature swings. Sturdier metal mesh and micromesh guards hold up better to high temperatures and quick changes. Steel micromesh is the top choice for fine debris because its extremely tight weave blocks particles that slip through standard screen guards.
When it comes to how gutter guards perform in heavy rain, well-designed micro-mesh systems are engineered to efficiently filter high volumes of water while still blocking debris. Some larger-mesh and screen guards may also handle high water flow effectively, but they often allow more debris to enter the gutter system. Foam and brush guards work as temporary DIY options, but debris can easily get trapped inside, requiring full removal for cleaning and frequent replacement due to their short lifespan.
The best gutter guards, however, are those that work best with your home’s design and your area’s climate.
| Guard Type | Not Ideal For | Best Climates | What to Know |
|---|---|---|---|
| Micromesh | Roofs with older or uneven gutter systems that cannot support a guard upgrade | Most climates; high rainfall | Most durable; low maintenance |
| Mesh | Very fine debris | Most climates | Solid mid-range option |
| Screen | High-wind areas and uneven roof edges where screens can lift | Mild climates | Low cost; shorter lifespan |
| Reverse-Curve | Homes where gutter guards need to be low-visibility | Heavy rain areas | Higher visibility; can warp |
| Foam Inserts | Areas with frequent rain or moisture (foam absorbs water and deteriorates) | Dry, mild climates | Short-term solution |
| Brush | Homes where the homeowner wants minimal ongoing cleaning | Dry climates | Frequent cleaning needed |
2. Skipping Critical Pre-Installation Checks (Pitch, Damage & Alignment)
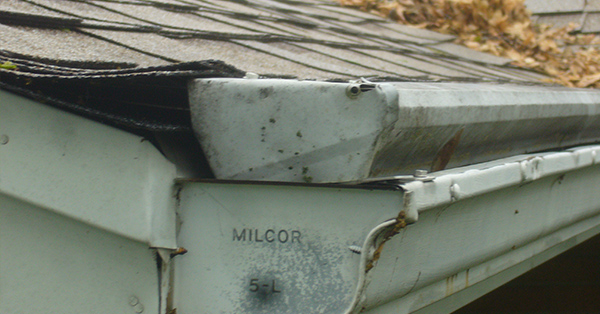
Start by assessing your existing gutter system’s condition and performance. Many homeowners install gutter guards over underlying problems that reduce their effectiveness. Check that gutters have proper pitch toward downspouts. Incorrect pitch can cause water to pool instead of drain, leading to overflow that can damage fascia, soffits, foundation, and landscaping.
Inspect for sagging sections, loose or missing hangers, fascia rot, and leaking seams at corners and joints. Installing gutter guards over structurally compromised gutters can lock in existing damage and make future repairs more difficult or costly. Ensure gutter hangers are secured, and gutters are properly aligned before proceeding. Gutter guards add weight to the system, so any structural weakness can worsen once they’re installed. Taking time to address these issues and verify structural integrity ensures your gutter guard investment performs as intended rather than masking problems that will require removal and repair later.
3. Skipping Pre-Installation Damage Inspection
Before you begin DIY gutter guard installation, complete a thorough inspection using this checklist:
- Sagging gutters: Look for sections that dip below the roofline or hold standing water, as this prevents proper drainage and can lead to overflow.
- Loose or missing hangers: Check that fasteners are secure every 24–36 inches along the gutter run to keep gutters level and supported.
- Fascia rot or damage: Inspect the board behind the gutter for soft spots, discoloration, or water staining, since damaged fascia cannot hold gutters securely.
- Leaking seams and joints: Examine corner miters, end caps, and seam connections for gaps, rust, or water marks, which can allow water to escape behind the system.
- Gutter pitch: Verify proper slope toward downspouts (approximately ¼ inch per 10 feet) to ensure water flows correctly and does not pool in the gutter.
- Rust, corrosion, or holes: Address any penetrations or deterioration before covering with guards, as weakened metal can fail once additional weight is added.
Address all necessary gutter repair tasks before installing gutter guards to ensure your system functions properly and your investment lasts.
4. Neglecting Downspout Checks and Integration
Gutter guards function best when water can exit through well-functioning downspouts. Start by confirming the downspouts are clear and able to move water efficiently. Check and clean downspouts by running water through them or using a plumber’s snake to remove clogs or obstructions. Verify that downspout sizing matches your gutter capacity. Undersized downspouts (less than 2×3 inches for standard 5-inch gutters) restrict flow and cause backup during heavy rain.
Check that downspout outlets direct water at least 4–6 feet away from your foundation and that downspout extensions or splash blocks are in place. If your gutter guards include outlet filters or downspout screens, ensure they’re compatible with your existing downspout configuration and won’t create added restrictions. Finish with a flow test by running a hose at the high end of each gutter section to confirm water moves freely and drains without hesitation at every downspout.
5. Incorrect Alignment, Panel Overlap, and Hanger Spacing
Optimal gutter placement relative to the drip edge is critical to catching water running off the roof. Even the smallest misalignment can cause water to overshoot the gutter entirely. For correct alignment, position the front edge of guards flush with the gutter’s outer lip and ensure the back edge sits just under or against the drip edge without lifting or disturbing shingles.
When it comes to panel overlap, installing multi-panel systems, overlap sections in the direction of water flow to prevent gaps where debris can enter. For hanger spacing, verify that gutter hangers are spaced correctly (distance varies based on climate) and are secure before adding guards, as any additional load can cause bowing or sagging in under-supported sections. Gutter guards positioned too high can create wind uplift, while guards installed too low may restrict water entry and lead to overflow during heavy storms.
6. Improper Attachment Methods and Fastener Torque
Never attach gutter guards directly to your roof. Fastening guards to shingles or other roofing materials breaks the roof’s water barrier, creates leak points that can lead to costly water damage, and may void roofing warranties. Gutter guards should attach to the gutter itself using manufacturer-approved clips, brackets, or self-tapping screws driven into the gutter edge. Use stainless steel or other corrosion-resistant fasteners appropriate for your gutter material (aluminum, steel, or vinyl).
Avoid overtightening screws as this can warp gutter edges, crack vinyl, or strip threads. Undertightening can also cause problems by allowing guards to shift, rattle, or blow off in the wind. When tightening, snug fasteners firmly without forcing them once resistance increases.
7. Omitting Sealant at Seams and Miters
Gutter guard seams, end caps, and corner connections require sealant to prevent water infiltration in any areas where leaks can occur. If your gutter corner leaks, apply gutter-grade silicone or polyurethane sealant (rated for outdoor exposure) where guard panels meet, at inside and outside mitered corners, and where guards terminate at end caps. Joints and seams are common failure points where water can seep behind the system. A seamless gutter system paired with micromesh steel gutter guards reduces the number of exposed joints and can help minimize long-term maintenance.
8. Disregarding Weather and Timing Considerations
Install gutter guards during mild weather in temperatures ranging between 40°F and 85°F so sealants can cure properly and materials remain flexible. Installing gutter guards during rain is dangerous and can lead to slips and falls. High or even moderate winds can catch loose guard panels and risk injury or damage. Freezing temperatures create the risk of slick surfaces and brittle materials that are difficult to work with.
For best results, schedule DIY installation in late spring or early fall when gutters are relatively clear, and temperatures are mild. Mid-fall can mean heavy debris, making pre-installation cleaning time-consuming. If installing in colder months, check that sealants are rated for low-temperature applications and store materials indoors until use. Always check the weather in advance and monitor for any afternoon rainstorms or showers.
Installing gutter guards in the right conditions helps ensure proper adhesion, safer handling, and longer-lasting performance.
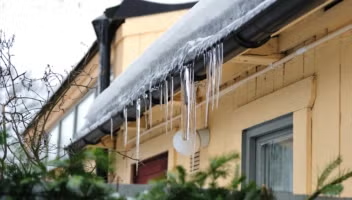
9. Installing Gutter Guards Under Shingles
Sliding gutter guards underneath the first row of shingles can compromise your roof’s integrity and void your roofing warranty. Lifting or disturbing shingles breaks the adhesive seal and disrupts the overlapping water barrier designed to shed rain away from the roof deck. Water can then enter and cause rot, moisture damage, and interior issues. Gutter guards wedged under shingles also create uplift points where wind can catch the edge and peel back both the guard and shingles, especially during storms. Quality gutter guard systems are designed to attach to the gutter itself without requiring shingle attachment. If installation instructions require going under shingles, consider a different guard system that protects gutters without compromising your roof.
10. DIYing Without Research or Understanding Warranty Impacts
Many gutter guard systems may appear easy to install, only to require precise measurements, specific fasteners, exact alignment, and compatibility verification that aren’t obvious from packaging instructions. Using generic screws instead of manufacturer-specified stainless steel fasteners, attaching guards to the roof instead of the gutter lip, or installing without proper pitch adjustment can void product warranties and leave you without roof coverage. Before taking on a DIY approach, consider whether you have the proper tools, safety equipment, and experience to carry out the installation.
Professional installers, like those at LeafFilter, can guarantee that your gutter guards are installed correctly, in a way that preserves your manufacturer and roofing warranties. They also have the right tools, the right training, and OSHA-certified safety equipment to handle complex rooflines and properties with multiple stores.
on LeafFilter®
Benefits of Proper Gutter Guard Installation
When gutter guards are installed correctly, they help your gutter system function more efficiently and reduce the amount of ongoing maintenance required. Professional-grade installation ensures gutter guards perform as designed, delivering benefits like these that justify the investment:
- Optimal water flow: Properly positioned guards direct roof runoff into gutters without overshoot or restriction, even during heavy rainfall.
- Protection from overflow and structural damage: Prevents water from spilling over gutter edges and damaging fascia, soffits, foundation, and landscaping.
- Reduced maintenance: Eliminates ladder work and frequent gutter cleaning.
- Improved gutter longevity: Reduces weight stress from debris accumulation and standing water that cause sagging, rust, and premature failure.
- Stronger home protection: Gutter guards installed without compromising roof integrity maintain both gutter function and protection against the weather.
- Premium filtration performance: Advanced systems like LeafFilter’s patented micromesh filter out common debris while maintaining consistent water flow, backed by a lifetime transferable warranty.
Why Trust LeafFilter’s Professional Installation
At LeafFilter, our professional gutter guard installation team helps eliminate the guesswork, safety risks, and costly mistakes that can come with DIY gutter guard projects. Our certified installation team begins by thoroughly cleaning out your gutters, inspecting for damage, realigning sections to proper pitch, resealing leaking joints, and ensuring your system is structurally sound before installing our patented micromesh gutter guard system.
Guards are attached using precise methods that secure them to the gutter— protecting your home’s water barriers and roofing warranty. Your new gutter guards are backed by LeafFilter’s lifetime transferable warranty, so you’re protected against defects, performance issues, and installation failures for as long as you own your home. This warranty transfers to future homeowners, adding value to your property. With professional installation, you receive high-quality protection installed correctly and the confidence that comes with expert workmanship.
Your Next Steps for Clog-Free Gutters
If you’re ready for clog-free gutters and want to protect your home without taking on the risks of DIY installation, schedule a free estimate with LeafFilter today. Our team will evaluate your current system and recommend the best long-term solution for your home. Our patented micromesh gutter guard technology helps prevent debris from entering the gutter that can cause clogs and is backed by our lifetime transferable warranty. Request your free estimate today and experience the difference proper installation and high-quality gutter protection make.
Frequently Asked Questions
How do I measure and verify gutter slope?
You can check the gutter slope by using a 2 to 4-foot level and a tape measure. Place the level inside the gutter near one end and lift it until the bubble centers. Measure the vertical distance from the bottom of the level to the bottom of the gutter. If the slope is correct, there should be roughly a ¼-inch drop for every 10 feet of gutter length. Repeat this measurement at multiple points along the gutter run to confirm a consistent slope toward the downspout.
Can I install gutter guards during winter?
Yes, winter gutter guard installation is possible, but temperatures generally need to stay above 40°F for gutter sealants to cure properly. Avoid installation during snowfall, on icy surfaces, or if gutters are covered in snow. Winter roof work also increases fall risk due to icy patches, frozen ladder rungs, and reduced grip from cold-stiffened gloves. Cold weather can make some guard materials more brittle. Store materials indoors before use and choose a 24-48-hour dry forecast window so sealants can cure fully without freezing or excess moisture.
How often should I inspect my gutter guards?
Inspect gutter guards at least twice per year: once in late fall after peak leaf drop and again in early spring before the heavy rains begin. After storms, check for debris on top of guards, loose or shifted panels, damaged sections, and proper water flow during Check that fasteners remain tight, seams are intact, and guards sit flush against the gutter without gaps or uplift, and address any issues immediately.
Can I install my gutters myself?
You can install gutter guards as a DIY project if you’re choosing simple, drop-in styles such as brush or foam guards. More advanced systems, especially those requiring precise alignment, fastening, or compatibility checks, are better installed by professionals. DIY installation can work, but the long-term performance depends on accuracy and proper fit, which can only be guaranteed by professional installers.
Should gutter guards be installed under shingles?
Most gutter guards should not be installed under shingles. Lifting shingles can break the seal, disrupt the water barrier, and may void roofing warranties. Always follow manufacturer guidelines. Shingles should remain fully adhered to maintain a proper seal against water and wind.
Should you screw in gutter guards?
Some gutter guards do need to be screwed into either the gutter or the fascia board, but they should never be screwed into or through roof shingles. Whether screws are required depends on the gutter guard design. LeafFilter gutter guard installation attaches directly to your gutters and does not require altering your roof.
How hard is it to install gutter guards?
Difficulty varies by product. Foam and brush guards are the simplest because they sit inside the gutter. Screen guards may require cutting or light fastening. Micromesh guards, like those of LeafFilter Gutter Protection, generally require precise alignment, correct fasteners, and compatibility checks, so professional installation is recommended for best performance.
What tools are needed to install gutter guards?
You’ll generally need a stepladder or extension ladder, gloves and goggles, a drill and screws, and tin snips. You may also need a hacksaw to cut the gutter guards to size. Always consult the guard manufacturer’s recommended tools.